
Is your rear end tired and dragging a little lately? Well, I have a fix for you! One of the best ways to increase the ground clearance at the rear of your buggy is to adjust the torsion bar tension.
Running your buggy with the rear camber at a nearly flat stock setting is great for running on the pavement. But off-road, you want to miss as many of those low flying rocks as possible to prevent damage to engine and transmission. If you do any camping in your buggy you have probably found that a car loaded down with camp gear sits even lower. A skid plate can take a certain amount of abuse, but you can still sustain damage if you are in a really nasty area. All you have to do is come down hard on sharp rock and you can punch through the skid plate or break its mounts.
To increase your height off the ground you could get bigger rear tires. But taller tires means taller gear ratios and slower freeway speeds. To compensate you could put custom gear ratios in your transmission for mega-bucks. Taller tires also often hit the sides of your buggy and eventually wear a semi-circle in the outer edge of the fender. To deal with this you need to install a lift kit to raise the body 3 inches above the floor pan which affects the looks of your car and entails a lot of work. Pneumatic shocks and shocks with springs can help raise a car somewhat, but the increased tension in the shock mount can cause it to break off. The best answer is to adjust the torsion bar tension and it is the cheapest too!
The trick to adjusting your torsion bars is to use a rolling floor jack and four feet of chain to correctly position the spring plate. If you don't have the right equipment don't try this because I don't think it is possible without it. This procedure is somewhat easier to do if the engine and transmission are already removed from the car but it is not a requirement.
The first step is to jack the car up and support it on jack stands directly under the round torsion bar housing. Remove the rear tires and shock absorbers then disconnect the brake lines. Remove the bolts that hold the axle to the rear torsion arms (spring plates). Slide the axles back off the spring plates. Use a rope tied to the axle to pull it back and upward so that it is not in the way. If you have an IRS suspension, it may be necessary to disconnect the rear axle and remove the swing plate.
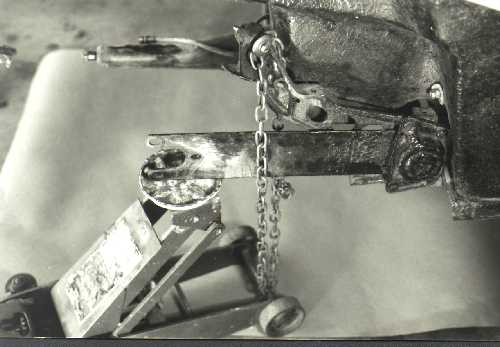
Be aware that there is still great tension on the swing plates. There is a lip in the shock tower casting that keeps the swing plate from dropping down. The axle keeps the swing plate from moving out past the lip, but with the axle removed the swing plate can slip past the lip and come crashing down. Place your hydraulic floor jack under the end of the swing plate. Now loop the chain under the axle of the floor jack and up over the shock mount. Bolt the ends of the chain together and bolt the chain to the shock mount hole. This lash-up is absolutely necessary to control the tension on the swing plate. Without the chain, jacking the swing plate will lift the entire car and not change the position of the swing plate. It is not safe to proceed without the jack and chain in place.
Remove the four bolts that hold the torsion bar side cover in place. You may need to chip off the tar coating before you can get a socket over the bolts. These bolts are usually tight and rusty so you will need to use a hefty 1/2 inch drive socket set here, but don't break them off! Remove the side cover and inspect the rubber torsion bar support bushing inside the cover. These get worn and usually need to be replaced. There is another rubber bushing behind the swing plate that must also be replaced.
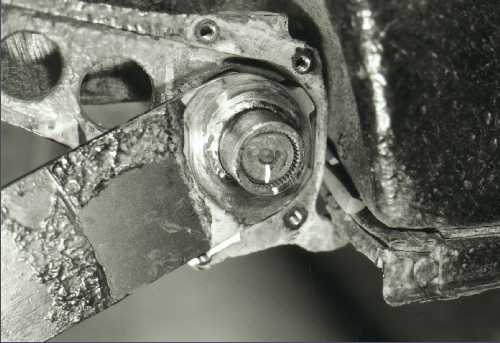
The torsion bar has splines on both ends. The inner end slips into a fixed spline at the center of the car and the swing plate slides on over the splines at the outer end. The number of splines on each end is different. The inner end has 40 splines and the outer end has 44 splines. Displacement of one inner spline corresponds to a rotation of 9 degrees and the displacement of the outer spline corresponds to a rotation of 8.17 degrees. Very small angle adjustments ( 0.83 degrees) can be made by rotating the inner torsion bar spline forward one spline and rotating the outer swing plate back one spline. To simplify our adjustment, it should be noted here that we do not want to remove the torsion bar from the car or even allow it to slip out of the splines at the center of the car. We are going to slip the outer spring plate down only one spline position without changing the inner spline setting. Now is a good time to mark the torsion bar and swing plate so that the original position can be identified. I use a Dremel tool with a grinding disk to cut a tiny groove in the torsion bar and swing plate. The torsion bar is too hard to dimple with a punch.
The tension on the swing plate is so great that it can not be pried off the torsion bar spines. To remove the swing plate you must first jack the swing plate up to a level position so that it is no longer resting on the lip of the casting. Jack it up high enough so that a large flat blade screwdriver can be placed over the lip and up under the swing plate. The object is to use the screwdriver as a ramp that the swing plate will slide over as it is lowered.
As the swing plate is lowered, its own tension will force it out off the torsion bar and over the lip in the shock mount casting. This must be done slowly in small increments. Each time you lower the jack a little, use a hammer to hit the end of the torsion bar. This will keep the torsion bar in the car and allow the swing plate to slide off the outer splines. When the swing plate is out past the lip in the casting, jack it up and remove the screw driver. Then lower the swing plate all the way down until it is no longer supported by the jack. Now use the Dremel tool to grind a tiny groove in the cast iron shock mount just below the bottom edge of the swing plate. This is necessary to document the position of the stock torsion setting in case we screw up and need a reference point to start over.
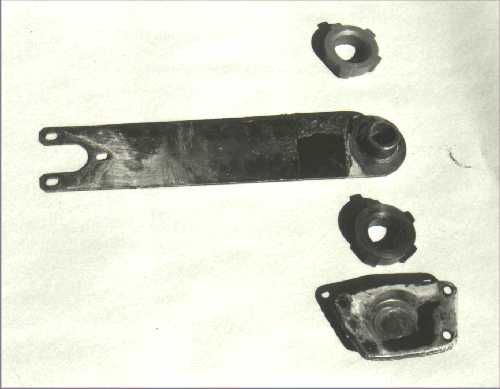
The swing plate can now be removed by continuing to tap on the end of the torsion bar with a hammer. Pull off the swing plate and inspect the rubber bushing on the inner side (it may need to be pried out of the torsion housing). Note that the spline housing on the inner side of the swing plate is a different diameter than the outer spline housing. When buying replacement rubber bushings make sure you get two inner bushings and two outer bushings because they are different sizes. You should also consider buying the off-road nylon replacement bushings. They are much tougher than the rubber ones and last longer. The downside is that they may squeak a little, but I have not noticed this to be objectionable. Be sure to sand the spline housing smooth before replacing the bushings. You may need to grind a little off the corners of the nylon bushings to get them to fit into their housings. Rubber bushings require a graphite coating before installation.
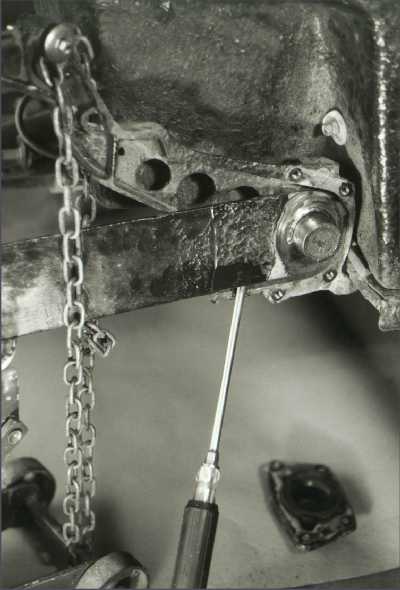
Grease the spines and slip the swing plate back on the torsion bar in a position that is one spline lower than the previous position. You should be able to set this by checking the marks that were made earlier. When the swing plate is in the correct position, the bottom edge of the swing plate should just cover one half of the lower rear cover plate bolt hole. This setting is recommended by Jeff Hibbard in his book about preparing vehicles for off-road use.
Jack up the torsion bar until it is above the lip of the shock mount casting. Then us a 5 lb. hammer to whack the swing plate back on the spline. Mack sure that it is in as far as it will go or you will have trouble putting the cover plate back on. You can now install the cover plate and outer bushing. You are likely to find that the holes in the cover plate do not line up with the bolt holes in the shock mount casting. Do not put the bolts in at an angle and strip the threads or you will need to get a new chassis for your car! Proper alignment can be obtained by jacking the spring plate up and down which changes the position of the torsion bar relative the bolt holes. Be sure to put anti- seize lubricant on the bolts.
Lower the jack until the swing plate is barely resting on the lip. Then use a "C" clamp to clamp the swing plate to the casting so that it will not slip off the lip. Lower the jack all the way down and remove it and the chain. Re- install the axle tubes and torque the bolts to 70 ft. lb. The clamp can now be removed and the shocks, brake lines, and tire can be re-installed. Repeat the entire procedure on the other side of the car. If the retaining lip on the cast iron shock mount is worn, it may be a good idea to install swing plate retaining straps (available from off-road suppliers) to keep the swing plates from dropping below the retaining lips.
Re-install the rest of the goodies that are spread all over the garage (i.e. skid plate, bumper, etc.) and it is Up! Up! and Away! with no more of that pain in the rear end.
